The Ultimate Guide to Model Context Protocol (MCP): Architecture, Examples, Cursor Setup, and Automation
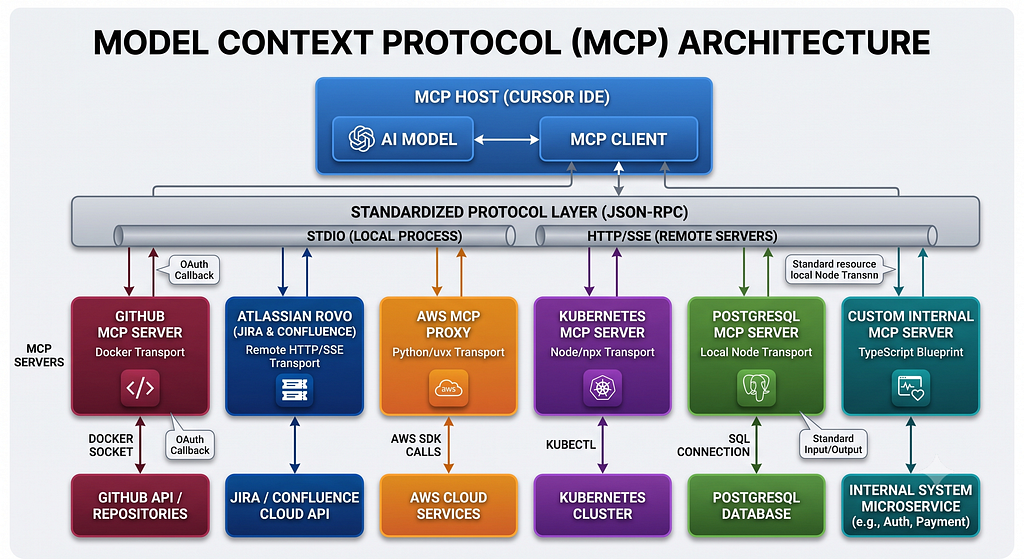
The AI landscape shifted dramatically with the introduction of the Model Context Protocol (MCP), open-sourced by Anthropic. For a long time, Large Language Models (LLMs) were confined inside information silos, acting as highly intelligent chatbots reliant on static training data. If you wanted them to inspect a code repository, track a Jira ticket, or check a production database, you had to write custom, fragile API integrations for every single model.
MCP elegantly solves this $N \times M$ integration problem by acting as an open standard protocol — similar to how USB-C standardizes hardware connections or how the Language Server Protocol (LSP) revolutionized code editors.
Understanding the MCP Architecture
MCP defines a standardized framework for integrating AI models with external data sources and execution runtimes. The architecture relies on three primary components:
- MCP Host: The runtime environment where the user interacts with the AI (e.g., Cursor IDE, Claude Desktop).
- MCP Client: An embedded client inside the Host that initiates requests, discovers capabilities, and communicates using the JSON-RPC 2.0 protocol.
- MCP Server: Lightweight, modular binaries or scripts that expose specific tools, resources, and contextual prompts to the client.
The 6 Essential MCP Ecosystem Examples
MCP servers can communicate using two primary transport layers: Stdio (local process pipes) and HTTP with Server-Sent Events (SSE) (remote servers). Below are 6 definitive, real-world examples commonly used to empower AI engines with context.
1. GitHub Integration (Docker Transport)
The official GitHub MCP server allows your AI agent to manage repositories, review pull requests, create issues, and search code snippets completely within your local context.
Cursor/MCP Configuration JSON:
JSON
{
  "mcpServers": {
    "github": {
      "command": "docker",
      "args": [
        "run",
        "-i",
        "--rm",
        "-p",
        "127.0.0.1:8085:8085",
        "-e",
        "GITHUB_OAUTH_CALLBACK_PORT",
        "ghcr.io/github/github-mcp-server"
      ],
      "env": {
        "GITHUB_OAUTH_CALLBACK_PORT": "8085"
      }
    }
  }
}
Note: On first startup, the server prompts you to sign in via a secure OAuth browser callback, keeping your personal access tokens safely abstracted out of static text files.
2. Atlassian Jira & Confluence (Remote HTTP/SSE Transport)
Powered by Atlassian Rovo, this endpoint connects your coding agent to your team’s tracking and documentation hub. The AI can summarize technical debt or instantly log bugs based on syntax errors.
Cursor/MCP Configuration JSON:
JSON
{
  "mcpServers": {
    "atlassian-rovo": {
      "url": "https://mcp.atlassian.com/v1/mcp/authv2"
    }
  }
}
3. AWS Infrastructure Control (Python/uvx Transport)
AWS provides an enterprise-ready managed remote proxy server (mcp-proxy-for-aws). It translates natural language into AWS SDK calls, running authenticated via your locally active AWS CLI session (aws sts get-caller-identity).
Cursor/MCP Configuration JSON:
JSON
{
  "mcpServers": {
    "aws-mcp": {
      "command": "uvx",
      "args": [
        "mcp-proxy-for-aws==1.6.2",
        "https://aws-mcp.us-east-1.api.aws/mcp",
        "--metadata",
        "AWS_REGION=us-west-2"
      ]
    }
  }
}
4. Kubernetes Orchestration (Node/npx Transport)
The community-favorite kubernetes-mcp-server gives your AI agent visibility into your active cluster. It wraps kubectl and Helm commands, enabling live health analysis, pod log tailing, and deployment scaling via natural language.
Cursor/MCP Configuration JSON:
JSON
{
  "mcpServers": {
    "kubernetes": {
      "command": "npx",
      "args": [
        "-y",
        "kubernetes-mcp-server@latest"
      ]
    }
  }
}
5. PostgreSQL Database Inspector (Local Node/Stdio Transport)
Exposing database schemas safely to an LLM allows it to write exact, context-aware SQL statements without hallucinatory column lookups.
Cursor/MCP Configuration JSON:
JSON
{
  "mcpServers": {
    "postgres-db": {
      "command": "npx",
      "args": [
        "-y",
        "@modelcontextprotocol/server-postgres",
        "postgresql://localhost:5432/my_development_db"
      ]
    }
  }
}
6. Building a Custom MCP Server (TypeScript Blueprint)
If you need to connect your agent to a proprietary API, you can construct a custom server easily. Below is a production blueprint written in TypeScript using the official @modelcontextprotocol/sdk.
src/index.ts
TypeScript
import { McpServer } from "@modelcontextprotocol/sdk/server/index.js";
import { StdioServerTransport } from "@modelcontextprotocol/sdk/server/stdio.js";
import { z } from "zod";
// Initialize the custom MCP server
const server = new McpServer({
  name: "internal-system-mcp",
  version: "1.0.0",
});
// Register a custom system metric tool
server.tool(
  "get_system_status",
  "Fetches the internal operational health status of a target service micro-component.",
  {
    serviceName: z.string().description("The microservice name (e.g., auth, payment, gateway)"),
  },
  async ({ serviceName }) => {
    try {
      // In production, execute your actual internal API/database call here
      const healthStatus = serviceName === "auth" ? "Degraded (Latency 420ms)" : "Operational";
      return {
        content: [
          {
            type: "text",
            text: JSON.stringify({ service: serviceName, status: healthStatus, queriedAt: new Date().toISOString() }, null, 2),
          },
        ],
      };
    } catch (error: any) {
      return {
        isError: true,
        content: [{ type: "text", text: `Failed to fetch system metrics: ${error.message}` }],
      };
    }
  }
);
// Start listening via Standard Input/Output communication pipelines
async function main() {
  const transport = new StdioServerTransport();
  await server.connect(transport);
  console.error("Internal System MCP Server successfully bound to stdio!");
}
main().catch((error) => {
  console.error("Fatal initialization error:", error);
  process.exit(1);
});
How to Set Up MCP in Cursor IDE
Cursor supports native integration with MCP servers, allowing its Chat, Composer, and Agent modes to call tools automatically when required.
Method A: Graphical Interface Setup
- Open Cursor and navigate to Settings (Gear icon in top-right) -> Cursor Settings.
- Select Features from the left-side panel and scroll down to MCP.
- Click the + New MCP Server button.
- Input your configuration details:
- Name: kubernetes
- Type: command
- Command: npx -y kubernetes-mcp-server@latest
- Click Save. A green indicator circle confirms successful discovery.
Method B: Global File Architecture Setup
You can bypass the UI by configuring the global JSON file directly. This is ideal for infrastructure engineers who manage configurations via terminal configurations.
- macOS / Linux: ~/.cursor/mcp.json
- Windows: %USERPROFILE%\.cursor\mcp.json
Alternatively, you can drop a project-specific .cursor/mcp.json file straight into the root directory of an enterprise workspace to securely distribute developer tooling configurations to your engineering squad.
End-to-End Automation Bash Script
The following production-ready automation script validates your local development runtime dependencies (node, npm, uv), provisions a structured custom workspace, generates your custom TypeScript MCP server code, and merges all 6 production patterns directly into your global Cursor profile.
Bash
#!/usr/bin/env bash
set -euo pipefail
# Text Formatting Constants
GREEN='\033[0;32m'
BLUE='\033[0;34m'
YELLOW='\033[1;33m'
CLEAR='\033[0m'
echo -e "${BLUE}=== Beginning End-to-End MCP Environment Orchestration ===${CLEAR}"
# 1. Dependency Verification Engine
check_dependency() {
    if ! command -v "$1" &> /dev/null; then
        echo -e "${YELLOW}Warning: Required dependency '$1' was not discovered on system PATH.${CLEAR}"
        return 1
    fi
    return 0
}
echo -e "${BLUE}[1/4] Verifying native platform runtime dependencies...${CLEAR}"
check_dependency "node" || { echo "Installing Node.js via package manager is required. Exiting."; exit 1; }
check_dependency "npm"
check_dependency "docker" || echo -e "${YELLOW}! Docker missing. The GitHub server preset will require Docker initialization.${CLEAR}"
check_dependency "uv" || echo -e "${YELLOW}! Astral 'uv' missing. Installing via curl pipeline...${CLEAR}" && curl -LsSf https://astral.sh/uv/install.sh | sh
# 2. Build Custom TypeScript MCP Server Module
WORKSPACE_DIR="$HOME/mcp-custom-workspace"
echo -e "${BLUE}[2/4] Initializing custom Node project layout at: ${WORKSPACE_DIR}${CLEAR}"
mkdir -p "$WORKSPACE_DIR/src"
cd "$WORKSPACE_DIR"
# Write Node Manifest
cat << 'EOF' > package.json
{
  "name": "internal-system-mcp",
  "version": "1.0.0",
  "type": "module",
  "scripts": {
    "build": "tsc",
    "start": "node dist/index.js"
  },
  "dependencies": {
    "@modelcontextprotocol/sdk": "^1.0.0",
    "zod": "^3.24.0"
  },
  "devDependencies": {
    "@types/node": "^20.0.0",
    "typescript": "^5.0.0"
  }
}
EOF
# Write TypeScript Compiler Configuration
cat << 'EOF' > tsconfig.json
{
  "compilerOptions": {
    "target": "ES2022",
    "module": "NodeNext",
    "moduleResolution": "NodeNext",
    "outDir": "./dist",
    "rootDir": "./src",
    "strict": true,
    "esModuleInterop": true,
    "skipLibCheck": true
  },
  "include": ["src/**/*"]
}
EOF
# Write Custom Server Logic File
cat << 'EOF' > src/index.ts
import { McpServer } from "@modelcontextprotocol/sdk/server/index.js";
import { StdioServerTransport } from "@modelcontextprotocol/sdk/server/stdio.js";
import { z } from "zod";
const server = new McpServer({ name: "internal-system-mcp", version: "1.0.0" });
server.tool("get_system_status", { serviceName: z.string() }, async ({ serviceName }) => {
  return {
    content: [{ type: "text", text: JSON.stringify({ service: serviceName, status: "Operational", checkedAt: new Date().toISOString() }) }]
  };
});
async function main() {
  const transport = new StdioServerTransport();
  await server.connect(transport);
}
main().catch(console.error);
EOF
echo -e "${BLUE}[3/4] Resolving packages and building binaries...${CLEAR}"
npm install
npm run build
# 3. Compile and Inject Global Cursor Configuration
CURSOR_CONFIG_DIR="$HOME/.cursor"
CURSOR_CONFIG_FILE="${CURSOR_CONFIG_DIR}/mcp.json"
echo -e "${BLUE}[4/4] Integrating configurations into global Cursor profile...${CLEAR}"
mkdir -p "$CURSOR_CONFIG_DIR"
# Generate complete composite JSON profile
cat << EOF > "$CURSOR_CONFIG_FILE"
{
  "mcpServers": {
    "github": {
      "command": "docker",
      "args": [
        "run",
        "-i",
        "--rm",
        "-p",
        "127.0.0.1:8085:8085",
        "-e",
        "GITHUB_OAUTH_CALLBACK_PORT",
        "ghcr.io/github/github-mcp-server"
      ],
      "env": {
        "GITHUB_OAUTH_CALLBACK_PORT": "8085"
      }
    },
    "atlassian-rovo": {
      "url": "https://mcp.atlassian.com/v1/mcp/authv2"
    },
    "aws-mcp": {
      "command": "uvx",
      "args": [
        "mcp-proxy-for-aws==1.6.2",
        "https://aws-mcp.us-east-1.api.aws/mcp",
        "--metadata",
        "AWS_REGION=us-west-2"
      ]
    },
    "kubernetes": {
      "command": "npx",
      "args": [
        "-y",
        "kubernetes-mcp-server@latest"
      ]
    },
    "postgres-db": {
      "command": "npx",
      "args": [
        "-y",
        "@modelcontextprotocol/server-postgres",
        "postgresql://localhost:5432/my_development_db"
      ]
    },
    "custom-internal-server": {
      "command": "node",
      "args": [
        "${WORKSPACE_DIR}/dist/index.js"
      ]
    }
  }
}
EOF
echo -e "${GREEN}=== Setup Complete! Please fully restart your Cursor IDE to initialize the tools. ===${CLEAR}"
echo -e "${BLUE}Target Profile Location: ${CURSOR_CONFIG_FILE}${CLEAR}"
Frequently Asked Questions (FAQs)
1. What is the difference between local (stdio) and remote (sse / streamable-http) MCP servers?
- Local (stdio) Transport: Cursor spawns the MCP server as a local child process. Communication happens entirely through standard input and standard output pipes. This is ideal for local databases, filesystems, or CLI tools running on your machine.
- Remote Transport: Cursor connects to an external URL using Server-Sent Events (SSE) or Streamable HTTP. This allows teams to share a centralized context server (like corporate documentation or centralized APIs) without everyone needing to run dependencies locally.
2. Can I scope MCP servers to a specific project, or do they have to be global?
You can do both. By default, Method B in the guide modifies your global mcp.json profile, which makes those tools available across all windows. However, if you drop a .cursor/mcp.json file directly into the root directory of a specific project workspace, Cursor automatically loads and merges those project-level servers only when that particular project is open.
3. Why does the automation script use node instead of ts-node to run the custom server?
While ts-node is convenient for quick development, running raw TypeScript files directly causes a performance bottleneck during LLM context handshakes. Compiling to JavaScript via tsc and executing with native node ensures the ~10ms execution latency required for seamless real-time AI tool-calling.
4. Does routing tasks through MCP compromise my code privacy or send data back to Anthropic?
No. MCP is an open-standard communication protocol that operates entirely locally inside your editor client. Cursor handles the LLM logic; the data fetched from your databases or local scripts is fed directly into the model’s immediate context window just like an open file would be. It does not send telemetry or database structures back to Anthropic or external servers unless you are explicitly using a remote cloud-hosted MCP transport.
5. Guide: Managing Secrets, Tokens, and Credentials in Cursor MCP
Giving an LLM agent access to your system means handing it credentials. Whether it’s a GitHub Personal Access Token (PAT), AWS access keys, or a PostgreSQL connection string, managing these variables safely prevents security risks and leaking tokens to git repositories.
Cursor securely routes credentials to MCP servers through three distinct methods, depending on how the server communicates.
Method 1: Local Environment Variables (stdio Servers)
Most local MCP servers require system keys passed on startup. You can specify these directly inside your mcp.json file inside the "env" object block.
JSON
{
  "mcpServers": {
    "linear-integration": {
      "command": "npx",
      "args": ["-y", "@linear/mcp-server"],
      "env": {
        "LINEAR_API_KEY": "lin_api_exampel1234567890abcdef"
      }
    }
  }
}
⚠️ Security Warning: The mcp.json file is stored as unencrypted plain text on your hard drive. If you use repository-specific .cursor/mcp.json configurations, never commit hardcoded keys to version control. Add .cursor/mcp.json to your global .gitignore.
Method 2: Dynamic Environment Interpolation (Highly Recommended)
To share configuration files with your engineering team without leaking personal keys, use Cursor’s native environment variable interpolation syntax: ${env:VARIABLE_NAME}.
This forces Cursor to dynamically pull values from your local machine’s shell runtime environment instead of reading static text.
JSON
{
  "mcpServers": {
    "github-enterprise": {
      "command": "npx",
      "args": ["-y", "@modelcontextprotocol/server-github"],
      "env": {
        "GITHUB_PERSONAL_ACCESS_TOKEN": "${env:MY_GITHUB_TOKEN}"
      }
    }
  }
}
To use this setup, expose the key in your terminal profile (e.g., ~/.zshrc or ~/.bashrc):
Bash
export MY_GITHUB_TOKEN="ghp_yourActualSecretTokenHere"Method 3: Static Authorization Headers (Remote HTTP/SSE Servers)
When linking to a remote or cloud-hosted corporate proxy endpoint via HTTP, you pass authorization headers using a parallel "headers" configuration block. Just like the "env" block, this natively supports dynamic variable interpolation.
JSON
{
  "mcpServers": {
    "internal-knowledge-base": {
      "url": "https://mcp.internal.company.com/v1",
      "headers": {
        "Authorization": "Bearer ${env:INTERNAL_API_KEY}",
        "X-Organization-ID": "dev-squad-alpha"
      }
    }
  }
}
Method 4: Interactive Browser OAuth 2.1
For spec-compliant modern servers (such as the official Atlassian Rovo integration or the GitHub Docker variant detailed in the article), you do not need to hunt down text tokens at all.
- Add the server block to your mcp.json configuration or via the UI.
- Navigate to Cursor Settings $\rightarrow$ Features $\rightarrow$ MCP.
- Under the server name, you will see a blue Connect button labeled “Needs authentication”.
- Clicking it triggers a browser popup to authenticate directly via standard OAuth (PKCE framework). Cursor receives and securely handles the rotating short-lived token lifecycle behind the scenes.
Quick Troubleshooting Check
If Cursor displays a red status light next to your credentialed server, verify that:
- You restarted Cursor entirely (environment variables are read only at initial editor spawn time).
- Your token contains no accidental surrounding quotes (") or trailing spaces inside the JSON string block.
- Your local terminal can execute the raw command successfully with the exact same variables active.
Final Thoughts
Look, the reason MCP is a big deal isn’t because it’s flashy AI magic — it’s because it cuts out a massive amount of tedious plumbing. Before this, if you wanted an LLM to look at a Jira ticket and check a database, you had to write custom API wrappers for every single model update. Now, you just plug in a server config and it just works.
Turning Cursor loose with MCP basically changes the AI from a chatbot that guesses things into a tool that actually looks at your real environment.
Just don’t get sloppy with your keys. Use the dynamic env var lookups, keep your local configs out of public git repos, and you’ll save yourself hours of copy-pasting terminal outputs into chat windows.
📢 Have questions or feedback? Drop a comment below or connect with me on Twitter/X@spysood!
Originally published on Medium.